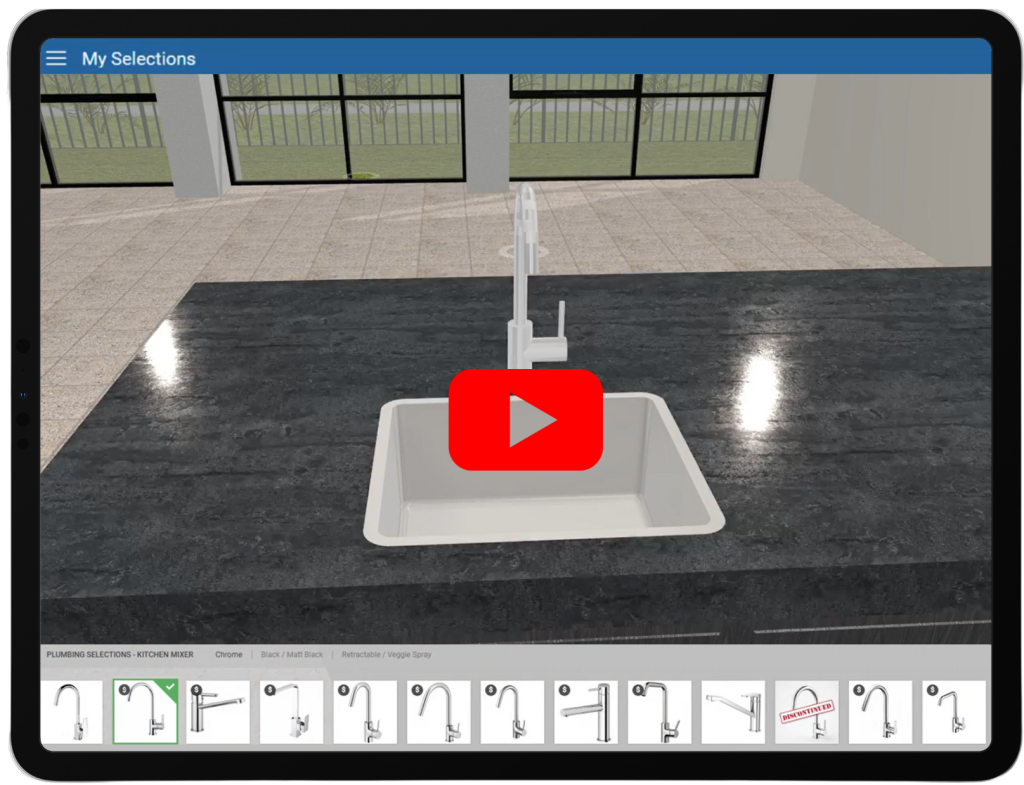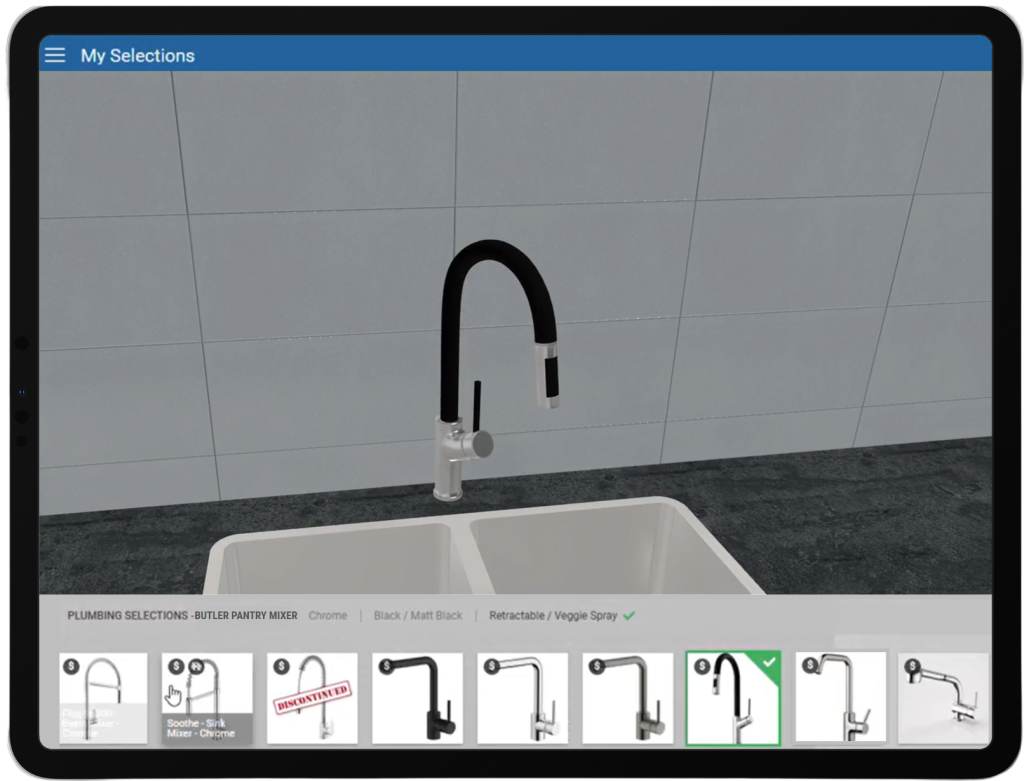
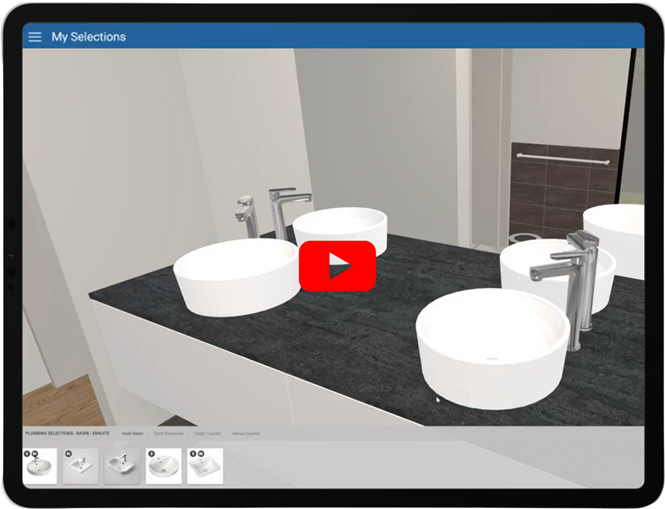
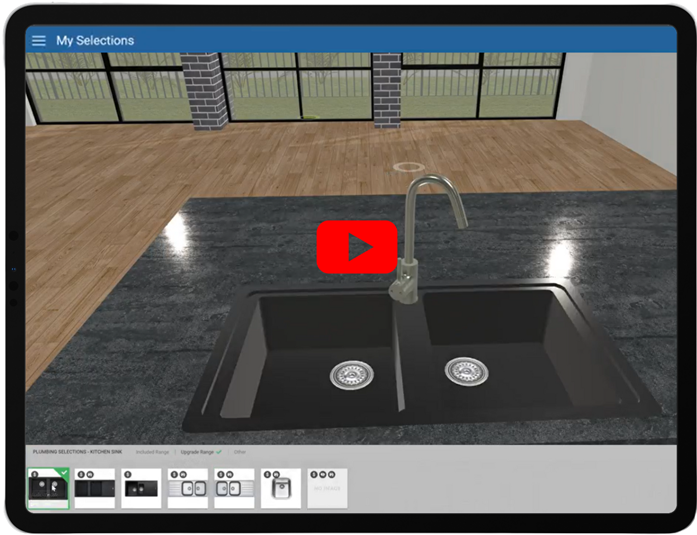
Prepare to be amazed as basins and sinks transform before your very eyes! With our latest breakthrough in 3D selection technology, you can now immerse yourself in a vibrant world of choices, with an expansive array of basin and sink models springing to life in stunning 3D detail. Say goodbye to static CAD mockups—clients are now empowered to explore mixers for kitchens, bathrooms, ensuites, and laundries in real time, choosing exactly what fits their vision without ever needing to guess the outcome or see the physical product. This game-changing update streamlines decisions, speeds up selections, and turns design dreams into brilliant, digital reality—all at the click of a button.
Experience it firsthand – Effortlessly customise selections and make confident decisions with unmatched precision.
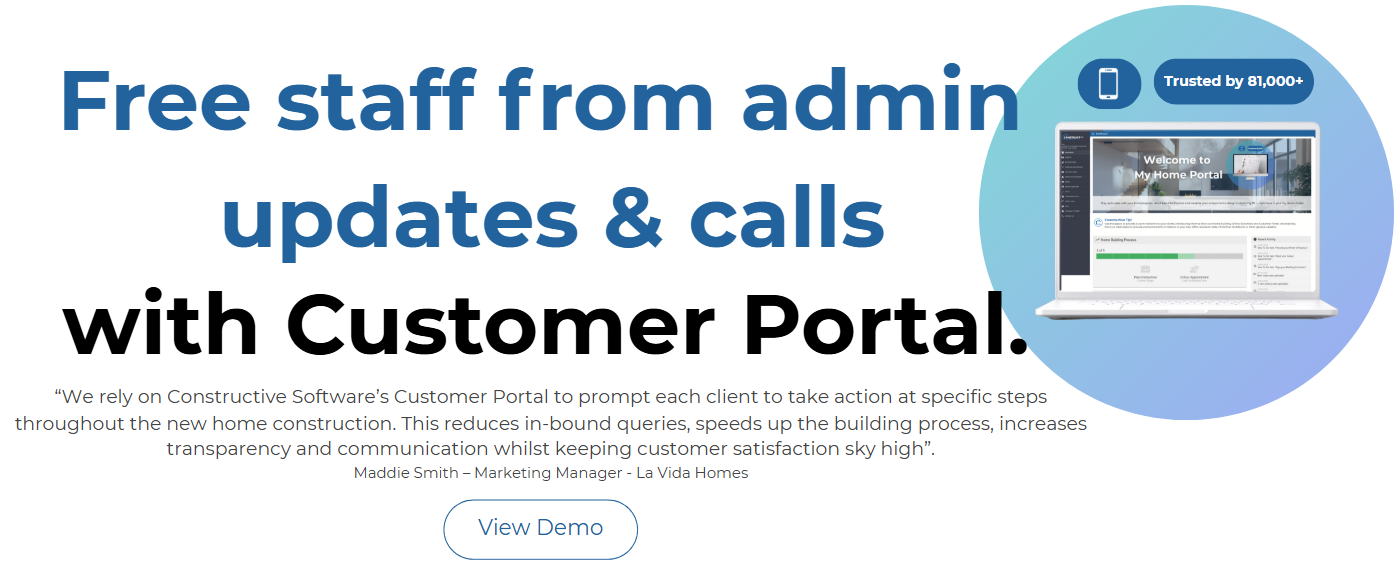
“When building a new home there is a lot of decisions to be made by our customers, the Constructive Online software allows our customers to make those important decisions like what fittings, style and colours to name a few to choose from the comfort of their homes – online. This software has improved the preparation needed for our staff for when they meet the customer in the prestart meeting.”
Pep Oliveri, Chief Technology Officer – JWH Group
32,000+ people thrive in 3D Online Selections during new home builds – A customer experience enhanced by Constructive’s leading technology.
“We compared 2 of our builders with a similar brand type, The builder with 3D+ Online Selections has an increase of 46.4% of selections made before appointment in comparison to the Builder who only has Online Selections”
James Salt – CEO – Constructive Software
Performance Enhancements
Single Sign-On (SSO) Improvements: SSO has been improved with clearer login messages, easier setup for new users, and the option to now include custom details like avatars and phone numbers directly from Entra ID. Builders can now control what user info is visible, and bulk account creation is supported by sourcing contacts from Entra ID and pulling through to Constructive. Bugs were also fixed to make onboarding of Single Sign on smoother. To setup the automatic sync of all relevant Entra ID users please reach out to support (stop manually creating users in Constructive).
User Management & Access Control: User management has been improved by automatically removing users from cancelled or resigned jobs (when the setting option for remove user on cancelled job is set to yes), ensuring user accounts are not auto locked when linked to a cancelled or resigned deal.
Enhanced Secondary Emails: Secondary emails are better handled to ensure clients receive important updates (excluding registration and password resets). Email support or your CSM to discuss upgrading your integration to pull through secondary emails from your source system).
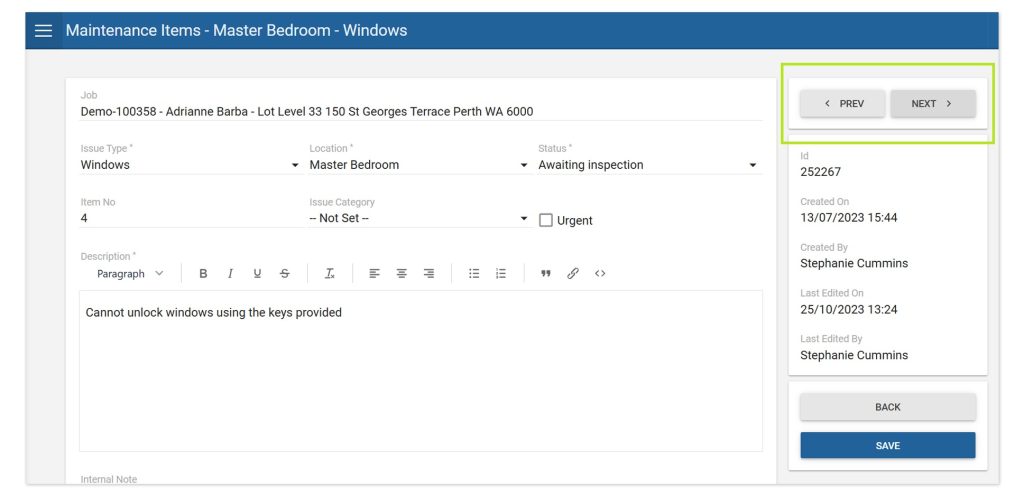
More Accurate 3D Model Displays: We have resolved an issue where internal 3D models, such as kitchens or interior rooms, could not be shown unless an external model (like a house facade) was also present. Now, clients can view detailed internal models even if an external model hasn’t been applied, ensuring a smoother and more accurate design review experience.
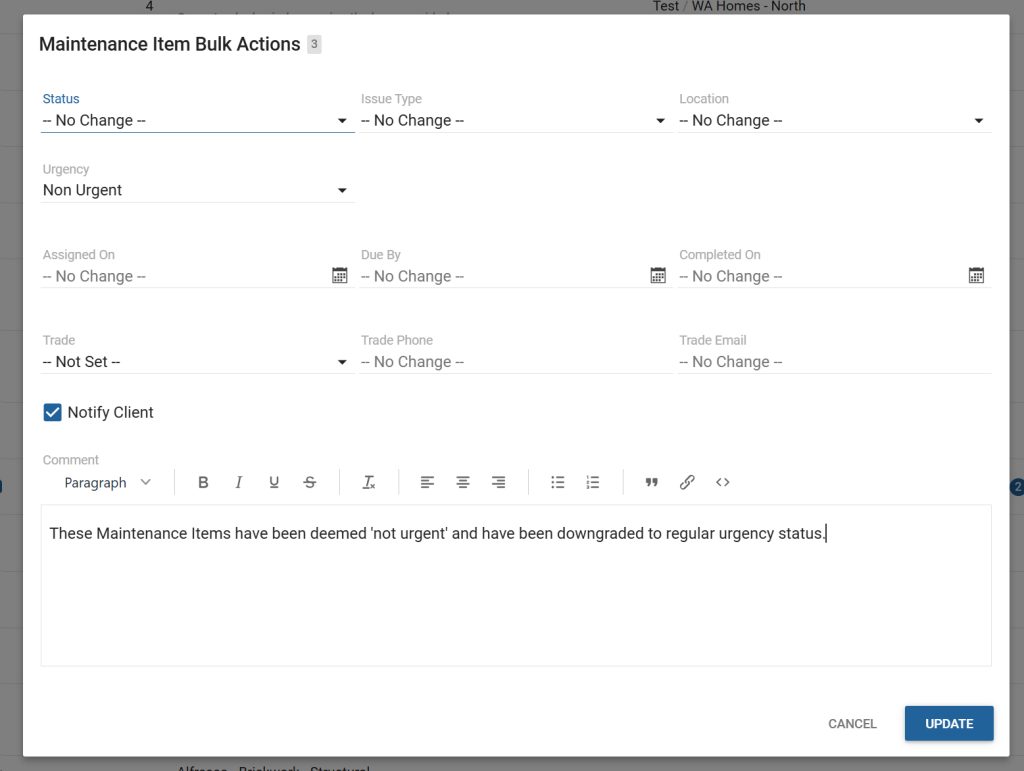
Product and Item Management: We have addressed an issue where Subject Matter Experts (SMEs) were not receiving email notifications when items in their assigned lists were discontinued. With this update, SMEs will now receive timely alerts whenever an item they manage is marked as discontinued. This ensures key stakeholders are promptly informed, reducing the risk of outdated selections remaining active and eliminating the need for manual follow-up.
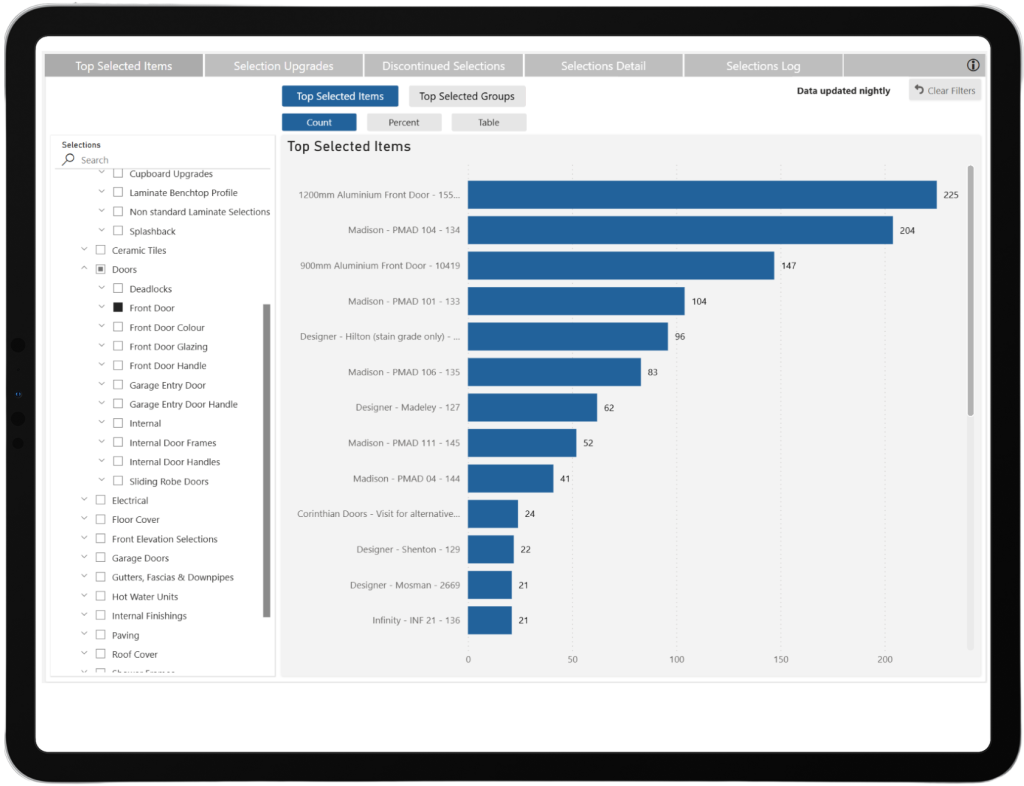
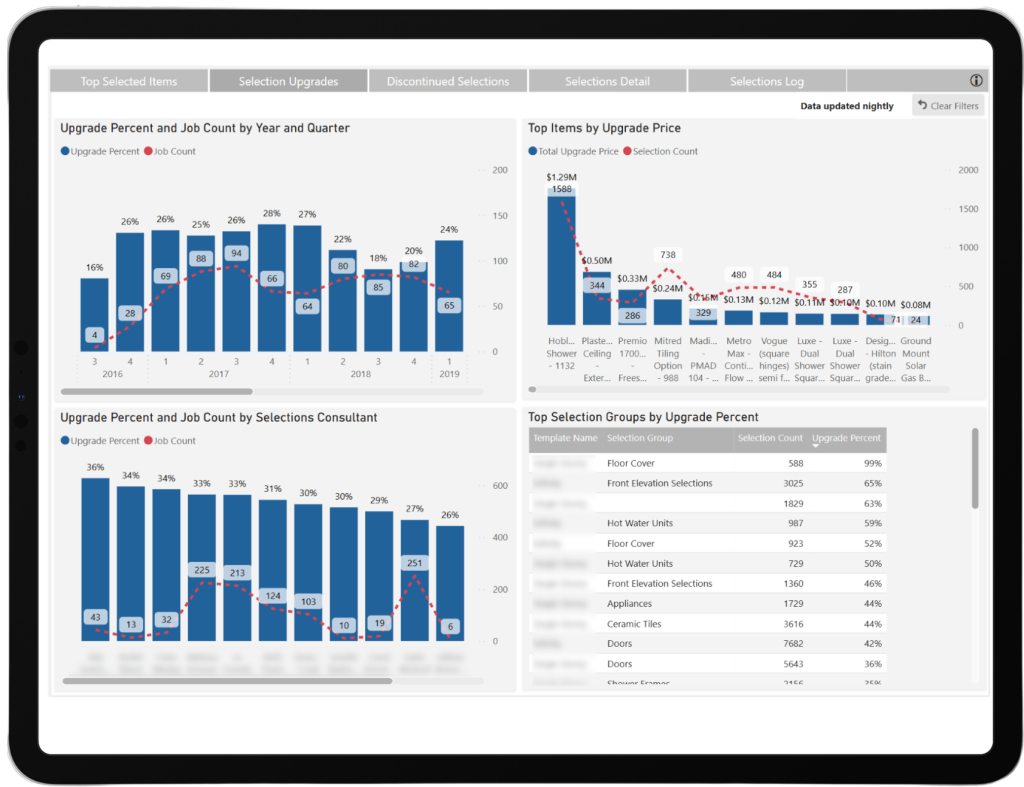
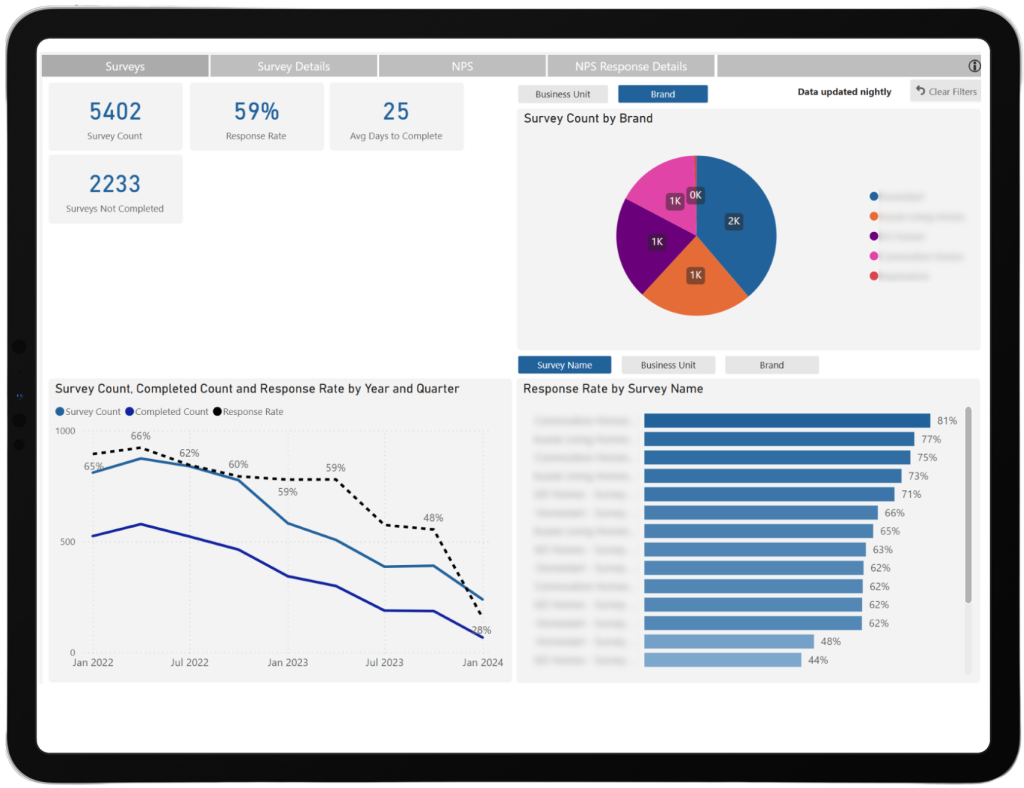
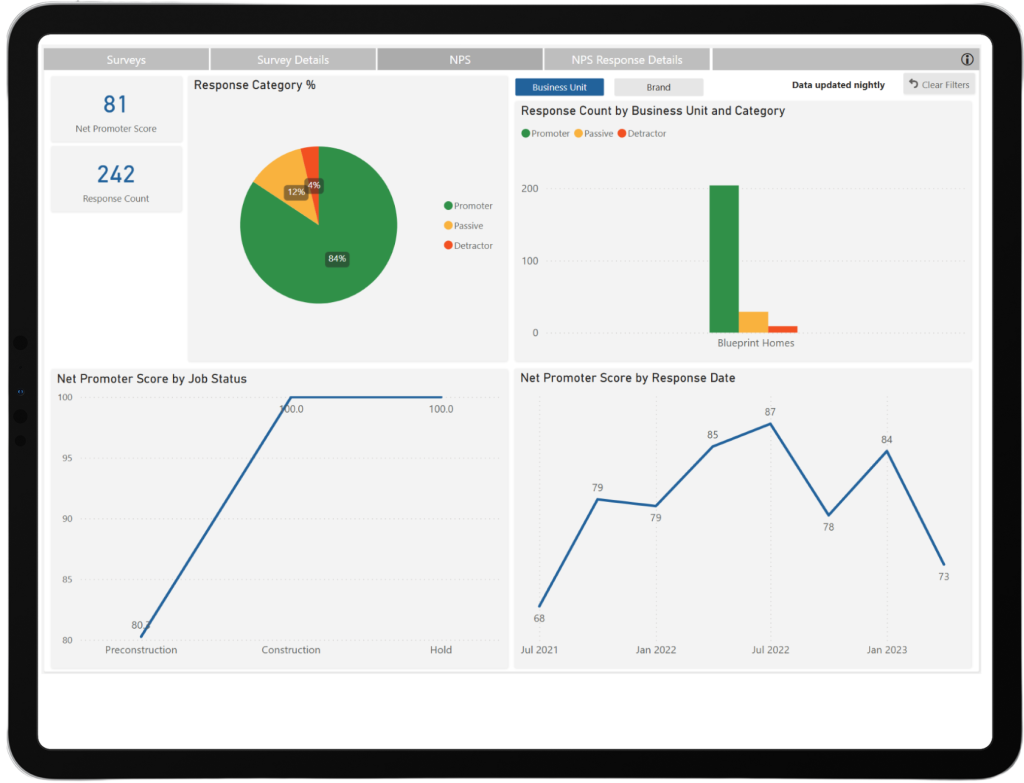
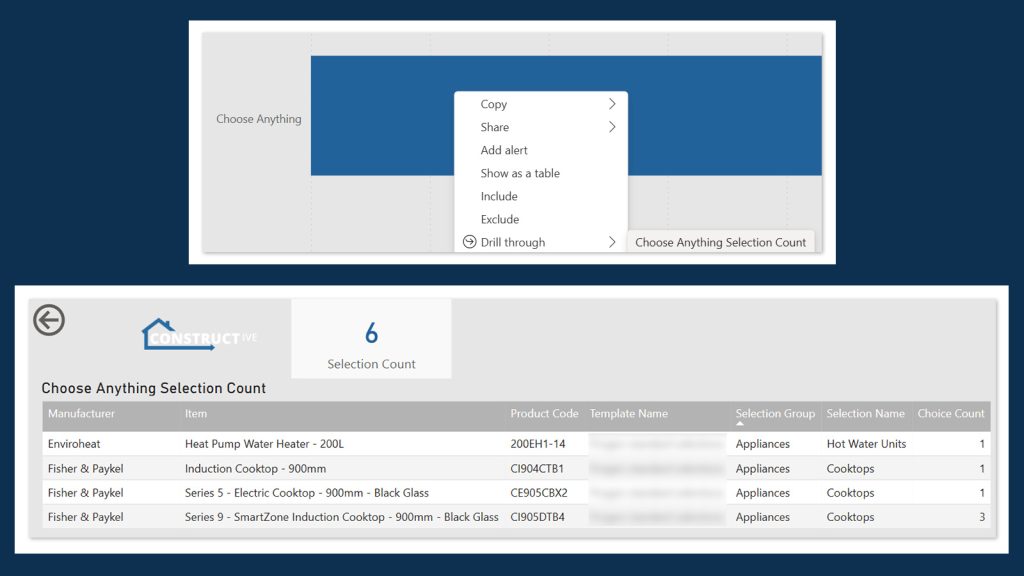
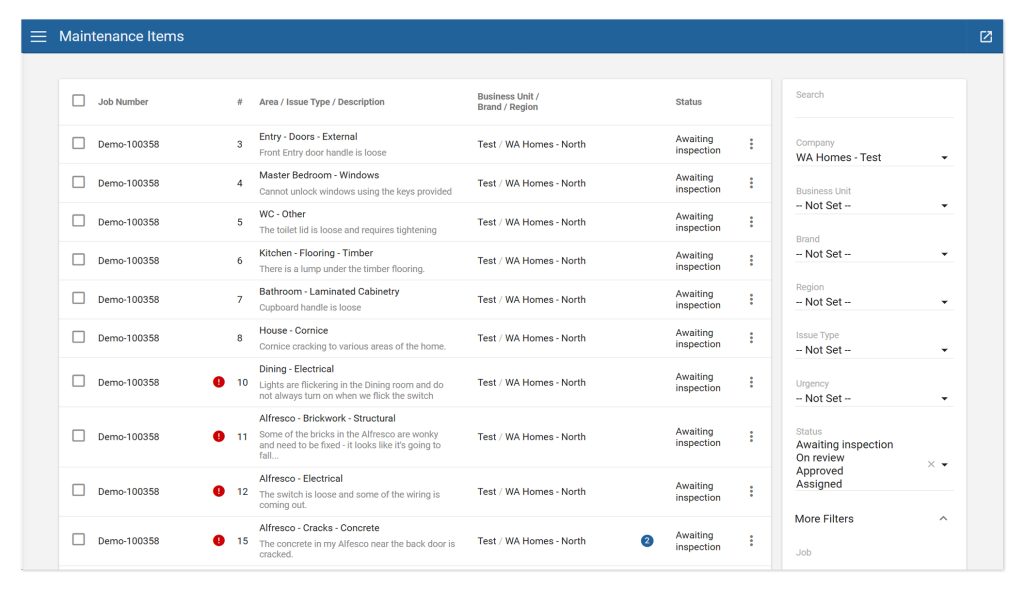
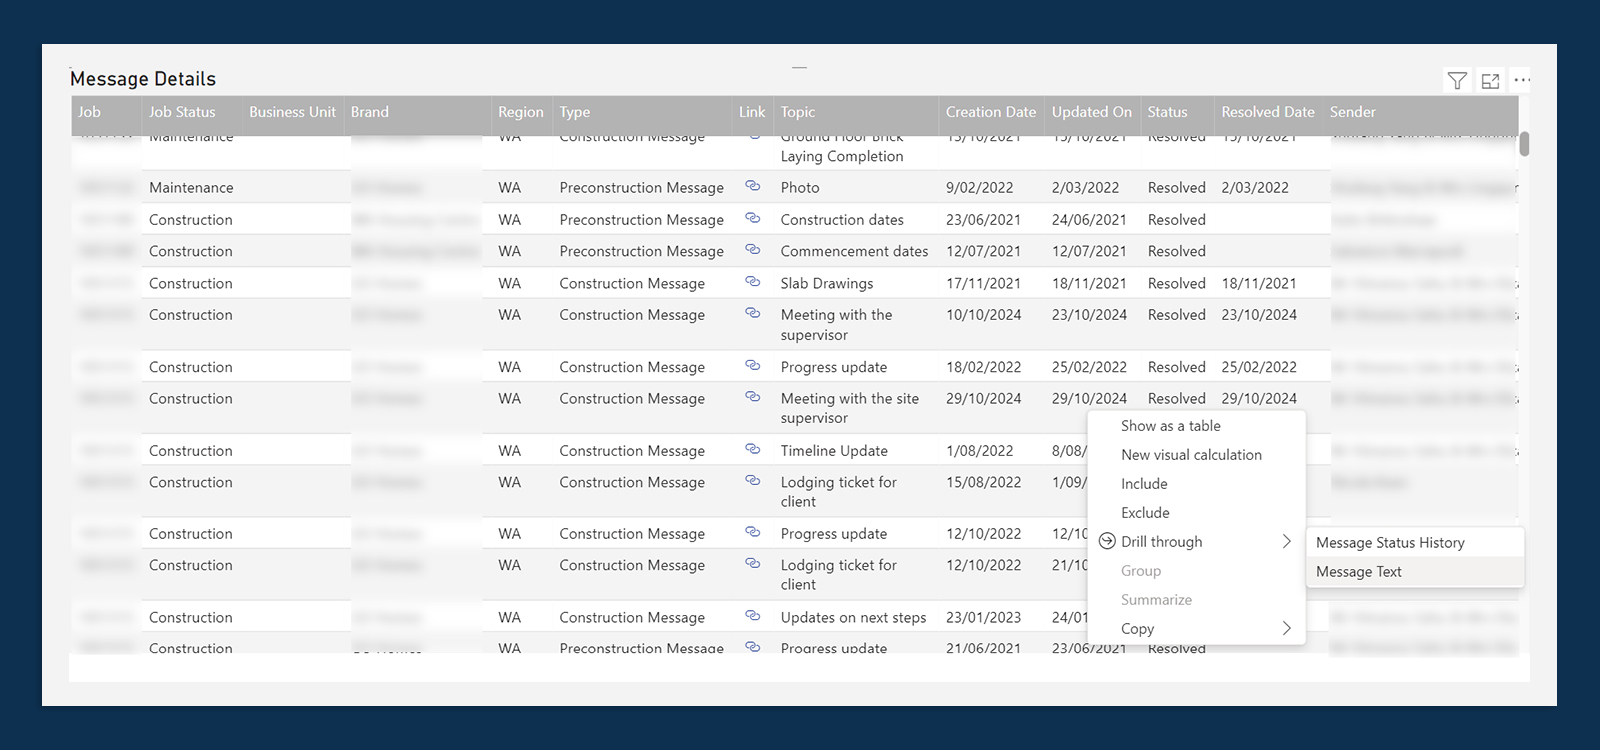
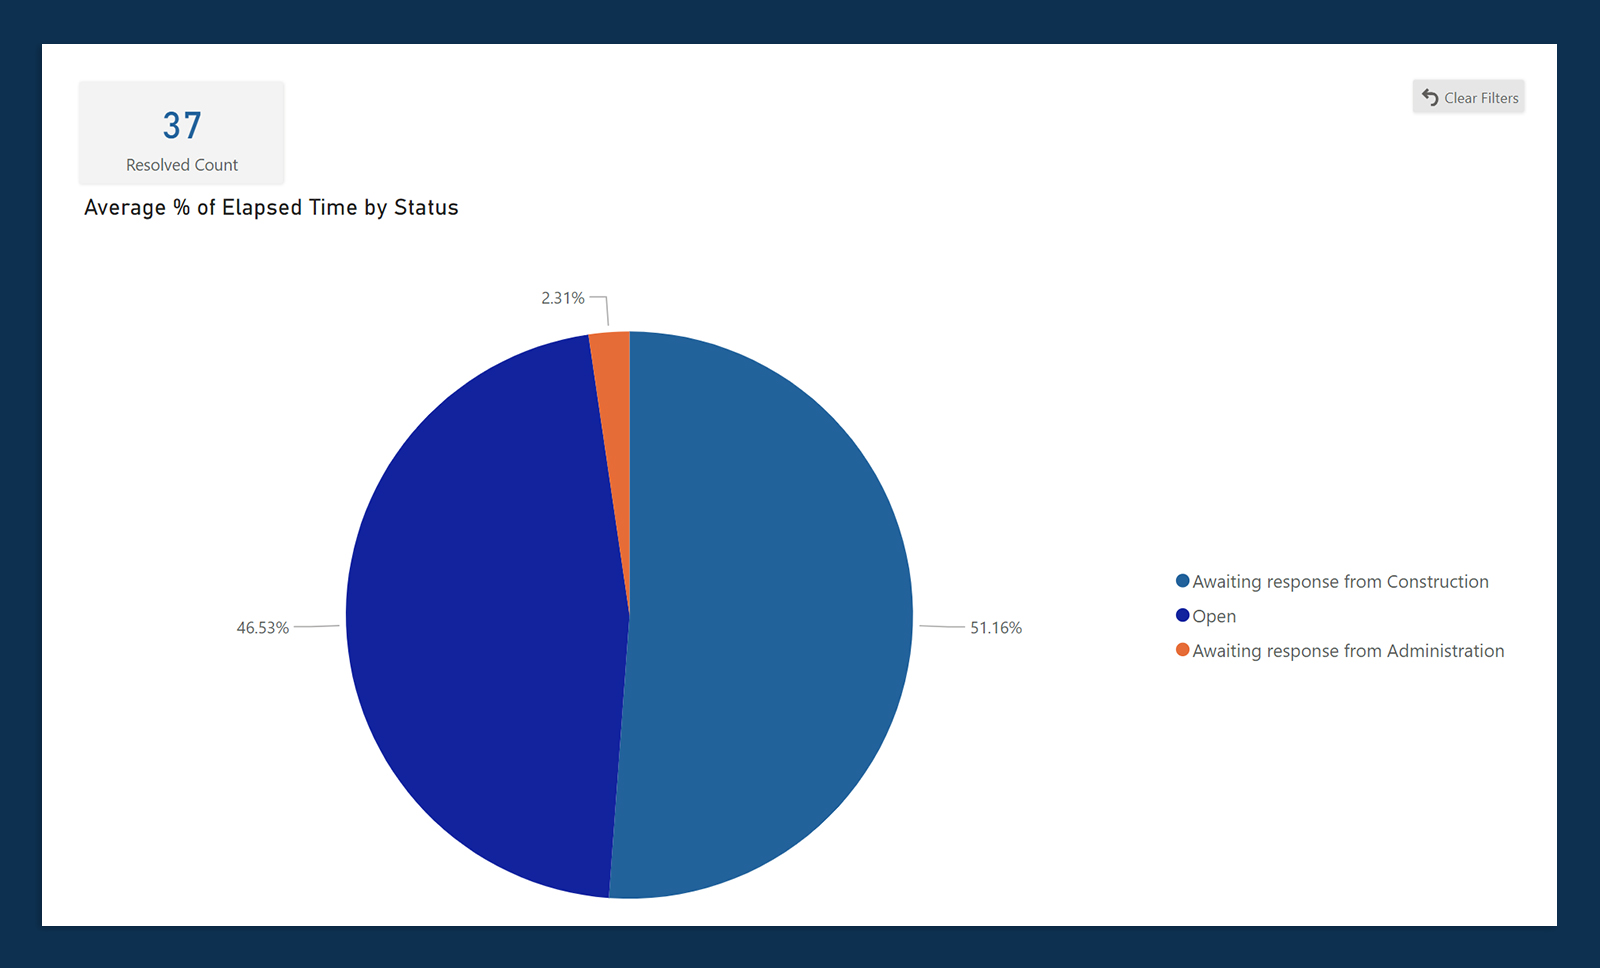
Intelligence Reporting: Continuing the migration of reports to be directly inside Constructive, we’ve added Document upload metrics to assist you with managing customer experience and digital engagement. We’ve also added the most important Selections report – Discontinued items so that you can see what discontinued products have been selected across your jobs, filtering to stage of build and/or manufacturer to help you manage your supply chain before it becomes a problem onsite.
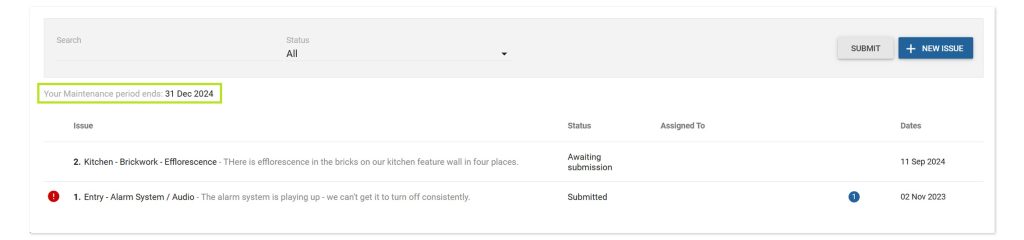
Client View Photos: We’ve now added the ability to put banner text on the photos page, to help with education of the clients. Talk to support to help you set this up.
Branding: We have enhanced the client view to show a custom Favicon in the browser window. Please talk to support about setting this up.
General Fixes and System Testing: Numerous refinements across user management, notifications, and system behaviours were implemented along with comprehensive testing of all updates to ensure stability and reliability for the 2025.4 software release.
If you have any questions after reading the full release notes, or want help navigating the new features, our team is here to support you.
Delivering excellent customer experience
We integrate with workflow systems
“Double-handling of client and construction data is a thing of the past. Constructive Software seamlessly integrates into key data points of BusinessCraft, enabling us to communicate in real-time to our clients: Documents, photos, Milestones and more.”
Fabio Fusari, IT Manager – Summit Homes.